Many readers have asked us about the intimidating task of refinishing wood floors. While we must admit we're not floor experts, we do know it's certainly not the sort of DIY idea that takes less than a weekend. But, it's also not as arduous and time consuming as you may think. In fact, DIY home renovations blogger Sara Hilton of Russet Street Reno actually refinished her living room in about two weeks -- with full-time jobs and breaks in between. When we reached out to the Wisconsin resident for advice, she shared with us a wealth of knowledge, including tips, her regrets and what you should know now if tackling wood flooring is in your near future.
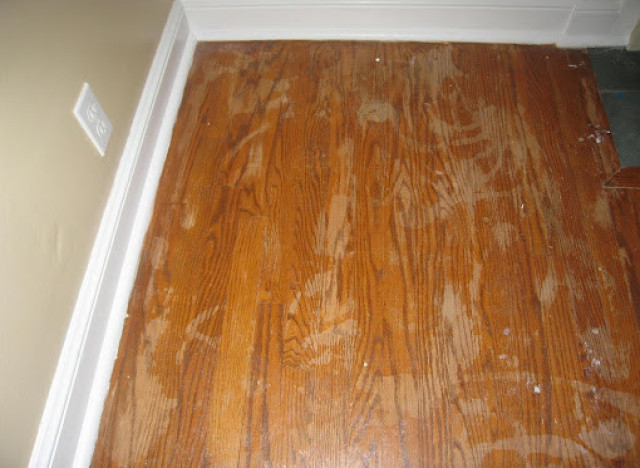
Photo by Sara Hilton of Russet Street Reno
When the Hiltons first moved into their home, they also inherited a 72-year-old wooden floor plagued with discoloration, dents and several scratches. Needless to say, the flooring conditions were not acceptable for the young couple. "We knew nothing [about floor refinishing] when we bought our house, but the day we closed, we went out and got a sander," Hilton says.
The prep. Before you start the sanding process though, make sure your floor hasn't been sanded too many times before. A good indication of this is seeing several exposed nails or staples in the floor. Next, determine whether you want to go with an orbital or drum sander. Hilton says most of her time researching online was spent looking at the pros and cons of sanders. "The drum sander is going to be harder on your floor," explains Hilton, adding, "The orbital sander is more forgiving but takes longer." Also, when at the hardware store, stock up on three to four times more sand paper than you think you need. Finally, remove everything out of the room and seal as many doorways and vents off as possible. "It's really imperative to make sure that every single space in the house you're not walking on is taped off, because dust will get everywhere!" warns Hilton.
Sanding. Because the Hiltons were first-time DIY floor refinishers, they opted for a less agressive orbital sander. Starting out, they used very coarse sandpaper. Sandpaper is measured by grit and identified by numbers from the 20s (very coarse, gritty paper) to the 100s (very fine). Hilton suggests using the 20s to 36-grade sandpaper at the beginning and gradually move toward 100 to 120 grit for the last round of sanding. And, although working with a sanding machine may seem intimidating, Hilton advises practicing to "get a feel of how it moves, but keep the sander moving at all times" to prevent any uneven surfaces. Finally, get to the corners with a hand sander.
Staining. Hilton emphatically suggests only doing one coat of stain. If you attempt two coats, some spots may absorb more into the floor than others. "Don't try to go too dark with your stain because you're probably not going be happy," says says. "While I love a dark floor against my white trim, it's a pain. It's a sacrifice you have to make. And espresso stain -- it's a lint magnet." An additional problem with using two coats of stain is that you'll have to use an oil-based stain, which takes longer to dry. And don't forget to wear rubber gloves, she warns, "unless you want that stuff to get under your nails. It looks like a zombie manicure."
Applying polyurethane. "For the poly, practice with a couple of different applicators," says Hilton, who used a three-inch brush and a lambswool applicator. For the lambswool, "the trick is to really defuzz it with painter's tape and mineral spirits," she advises. "Don't event try to save it and clean it off later." This step in the process was the most "maddening" for the new mom since poly coating will bubble over any hair and dust particules hidden on the floor. "We even put on full-body suits, with my hair in a hair net, and I still had little bubbles," she tells us. She coated her floors four times, with a 24-hour drying time in between. Finally, do not replace furniture until the poly is fully cured. On average, oil-based poly takes about a week and water-based poly takes about three days.
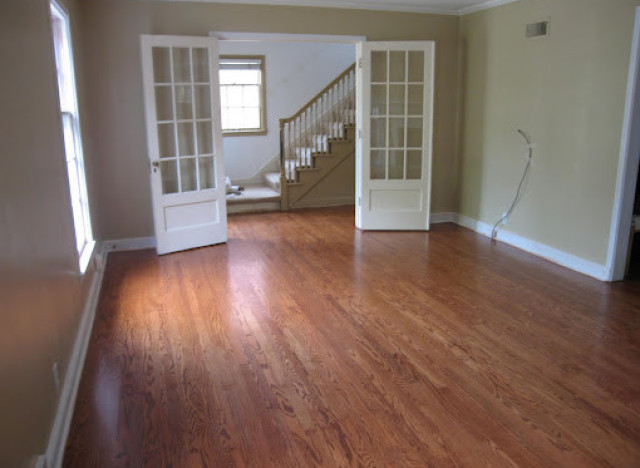
Photo by Sara Hilton of Russet Street Reno
In hindsight, Hilton says she would've gone with a water-based poly and would've sealed the vents and doorways before she started the project. But for a beginner, we think she did a fantastic job. Of course, it's easier to hire a professional, but when you can look at the difference you made in your home, there is a true sense of accomplishment. And, since her living room floor refinishing, Hilton has refinished other parts of her home and is now even using a drum sander. Practice does make perfect.
For the full tutorial and more tips for refinishing wood flooring, visit Russet Street Reno.